Posts

PickerView In SwiftUI

Image
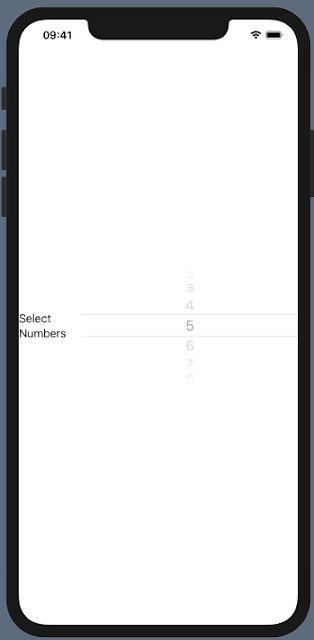
As we know to PickerView is similar to a Dropdown in iOS. You can select from a set of provided  items within a PickerView. So let's get started and add a simple PickerView where user can select a Number from 1 to 10. Code Snippet: struct ContentView : View {     var body : some View {         Picker (selection: . constant ( 4 ), label: Text ( "Select Numbers" )) {             ForEach ( 1 ..< 11 ) { index in                 Text ( " \(index) " ). tag (index)             }         }     } } Explanation: Picker takes two parameters here, selection and label . selection means the item which you want to be selected by default (number 5 here). label means the Title of Picker (Select Numbers here). Inside PickerView I have passed TextView's with each having number indexing 1 to 10. Hence this PickerView will display numbers 1 to 10. Output Screenshot:

Alert & Action Sheet in SwiftUI

Image
Alerts & Action Sheets do work in similar fashion as they do previously in Swift or Objective C. Below are the codes to achieve Alert and Action Sheet in SwiftUI. Both of these do have Title, Message and Buttons (you can add actions to them). Alert Sheet Code Snippet: struct ContentView : View {     @ State var choosenAction = "Hit the button to show Alert"     @ State var showAlert : Bool = false     var body : some View {         VStack (spacing: 50 ) {             Text ( choosenAction )                 . font (. largeTitle )                 . foregroundColor (. green )             Button (action: {                 self . showAlert . toggle ()             }) {                 Text ( "TOGGLE NAMES" )                     . padding (. all )                     . font (. headline )                     . foregroundColor (. white )                     . background ( Color . red )                     . cornerRadius (

Grid in SwiftUI

Image
In previous posts we have worked on TableView (List), now you would be curious to know about the CollectionView or Grid in SwiftUI. So there is no such thing as CollectionView in SwiftUI. Oh.. noooo... Lets discuss how to get a Grid in SwiftUI. Code Snippet: struct ContentView : View {     var body : some View {         List {             ForEach ( 0 ..< 10 ) { row in                 HStack (spacing: 20 ) {                     ForEach ( 0 ..< 3 ) { column in                         ZStack {                             Color (. red )                                 . cornerRadius ( 20 )                                 . onTapGesture (count: 1 ) {                                         print ( "Selected Row \(row) & Column \(column) " )                                  }                             Text ( "R \(row) - C \(column) " )                         }                     }                 }    

Button in SwiftUI

Image
Lets learn how to work with a Button in SwiftUI. Let me explain the code snippet: 1. Two private variables, one is buttonClicked which is a Bool that will toggle on button click action and the other is textOnLabel is a String with a default as BLACK. 2. In body I have a VStack with spacing 50, it will add a spacing of 50 between UIControls added inside the stack. 3. Inside this VStack; I wanted to have a Text (to display the Background Color of Button) and a Button . 4. Inside Button's action closure I toggled the bool value of var  buttonClicked and made a call to method buttonAction() . 5. Inside this  buttonAction  method I just changed the text of  textOnLabel  based on the  buttonClicked bool value. 6. To make Button UI better I added padding, background color, foreground color and cornerradius to it. struct ContentView : View {     @ State private var buttonClicked = false     @ State private var textOnLabel : String = "BLACK"    

Stack in SwiftUI

Image
In previous post we have used Stack but i have not explained it there. SwiftUI allows us to add nested Stacks too means you can have a HStack inside a VStack or vice-versa or any other combinations. SwiftUI has categorized Stack into 3 types: 1. HStack - Horizontal Stack 2. VStack - Vertical Stack 3. ZStack - Z Index Stack 1.  HStack  - If you want to place UI horizontally use this type. Code Snipped: struct ContentView : View {     var body : some View {         HStack {             Color (. red )             Color (. blue )         }     } } Explanation - Here i have created a HStack and added two Color's namely red and blue. Now you would like to ask me how you can add a Color instead of a View!!! So in SwiftUI we can treat Color also as a View, let me elaborate it. It will draw a View within a provided space by the HStack and fill it with the provided Color and returns it as a View. Output of Code Snippet: 2.  VStack  - This will a

Table with Dynamic Cell in SwiftUI

Image
In previous Post I demonstrated the ways we can have a Table in SwiftUI. Now lets get started to a simple demo where we can load dynamic info in table cell. I am creating a snippet where I want to load Roll Number and Name of students of a class in Table. For this I used List which will create rows equal to rollNosArray count (i.e. 4 for now). 1. Lets have two arrays, first for names and the other for roll numbers. 2. Iterate List through the rollNosArray, so we will have 4 rows/cells. 3. Now create a new Struct named DynamicCell. This is our custom dynamic cell. 4. As per my need I wanted Two Labels to display info inside a row horizontally. 5. So I took a HStack and inside it added two Text . 6. For a clear separation between two Text's I added a Divider .   7. Back to our ContentView Struct, inside List call this DynamicCell and pass the value to the two variables declared in DynamicCell Struct (name and rollNumber). 8. Execute the code and we have our expected T

Table in SwiftUI

In many apps we require list of items in a scrollable format, for this we used UITableView as of now. In SwiftUI we have many ways to create a Table. I will try to cover a few ways here. 1.  ForEach Loop with List: struct   ContentView :  View  {      var   body :  some   View  {          List  {              ForEach ( 0 ..< 10 ) { index  in                  Text ( "Current Row -  \(index) " )              }          }      } } 2.  List directly: struct   ContentView :  View  {      var   body :  some   View  {          List ( 0 ..< 10 ) { index  in              Text ( "Current Row -  \(index) " )          }      } } 3. Form directly: struct ContentView : View {     var body : some View {         Form {             Text ( "Row 0" )             Text ( "Row 1" )             Text ( "Row 2" )         }     } } 4.  Form with Sections: struct ContentVi